Dime 32
coach adjustments: auto flip: off, auto align: base

set audibles: cover 4 quarters, cover 4 drop
.jpeg)

choose play dbl safety go to bring Safeties down into the box, the audible to the play you want to run
.jpeg)
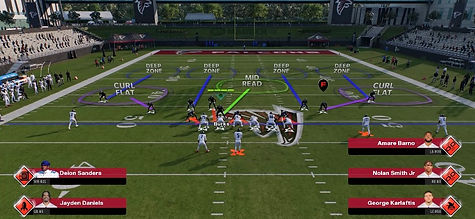
cover 4 quarters loop blitz: audible to cover 4 quarters out of dbl saftey go

switch on to the blitzing linebacker and move him just behind the other linebacker in a hook curl. then switch back to the linebacker in the hook curl and shade coverage overtop or underneath (triangle + right stick up/down) to turn off match.

then move user close to the left guard to make blitz look identical. when ball is snapped you do not have to engage oline, just drop into coverage

cover 4 drop disengage blitz: disengage set up can be ran out of many more plays such as cover 2/3. I will be showing for cover 4 drop but ideas can be applied to other similar plays with two middle lbs in the same spot
audible to cover 4 drop after coming out in dbl safety go
.jpeg)
then blitz both linebackers by pressing right arrow + right stick down
.jpeg)
switch onto right linebacker and put him back into a zone assignment by pressing x + left stick down (can optionally shade coverage), then move user Infront of the left guard. You want your user to be hovering Infront of the outside shoulder of the gaurd as close to the line of scrimmage as possible without being offsides. Once you have a good spot, hold the left stick down and wait for them to snap the ball. After the snap the ball run straight into the offensive guard then once he starts blocking you, disengage and run back into coverage.
couple of notes: if you are struggling to disengage oline as they wont let go try holding L2 when engaging.
If you want to take away a certain route you can man up your user to a player instead of putting him in a zone assignment, then after you disengage switch stick to a different defender and your user will resort to a man coverage assignment.
Play can also be ran to the right, same set up just user left linebacker in zone assignment and engage right guard, but since the loop from earlier can only be ran to the left, running this to the left makes them look identical to casual players.
.jpeg)
optional: since this disengage does not rely on d takle, you can drop your d takle into a hook curl if you have an agile player (double click left arrow + triangle + left stick to the left/right) to make the defence even more broken when the blitz comes in but note the sheds will be worse if it doesnt.
.jpeg)
extra tip for both dime defences: many players will abuse TE seam streaks from a TE close to the line of scrimmage. To stop this you can flip dbl safety go in the play call screen to better align your safety to play the TE seam streak( or put safety on te side into an inside third rather than quarter)
notice right inside safety alignment versus TE streak of
normal dbl safety go vs dbl saftey go flipped
.jpeg)
.jpeg)
43 even 61. coach adjustments: auto flip off, auto alignment base.
.jpeg)
set up: shift d line to the left ((left arrow + left stick left), slant d line to the left (left arrow + right stick left), qb contain (double click r1), shade overtop/underneath, then move your user in the middle of your dline as close to the right defensive tackle and the line of scrimmage as you can (should be over the left shoulder of the center). Then hold left stick forward and wait for ball to be snapped, then run forward and engage with the center then disengage and drop into coverage. Right D takle will sometimes loop around the center for free pressure otherwise every player is single blocked rushing 4 allowing for good shedding.
Notes: unlike dime 32 shading doesn't fully take away match principles.
play can be ran to the right as well, shift line and slant right, stand on right side of center, same idea
works best with the smallest and fastest d takle, sub in a re or le into the dtakle spot for best results (like the goat nolan smith)
.jpeg)